Wednesday, June 16, 2010

wall-eeeeee


Inspired by friends' handiwork and craft blogs, I longed for a jewelry board of my own.
I have lots of canvas squares, left over from two Christmases ago.
The fabric is from a vintage bank bag, like the kind you see starring in robbery heists. I spotted it at an Oregon coast antique shop. It was once cylindrical and had a toothy zipper, but I've long since torn it apart and pressed it into a single rectangular piece of fabric. It almost became a notebook cover for a boy, but then I thought...wait. I hate boys. :)
The buttons are my favorite. I've got a thing for vintage buttons, which almost competes for my interest of boys.
Of course, this jewelry board can't possibly hold up all of my necklaces (like bulky pearls or pendants), but at least my jewelry box is considerably less cluttered. Most importantly, my favorite necklaces - made of delicate chains - will no longer tangle each morning if they are neatly hung - hooray!
I arranged the rest of my pendants in a little candy dish that was a thrift store find.

And just 'cause, I felt inspired. Brooch tie!

applique? por que no?

In the last month or so, my gifts have been Applique Unbound.
Applique is a technique where a small ornament is applied on top of another surface. I think of as an intentional patch of fabric.
There's tons of information about how to properly apply appliques, like this video from Craftster.
I'm more haphazard. A wraparound blouse from Old Navy that was my friend's castoff had a pretty blue, pink and navy pattern. I cut out easy-to-sew shapes like circles and ovals and either hand-stitched or used a zigzag stitch on my machine to create easy, peasy appliques. 'Cause that's how I roll.
In no particular order...
A bag for a friend's baby shower:

Applique-decorated beanie hat for a dear friend's birthday (I made the hat out of a recycled sweater):

And I'm a bit ashamed to admit this one, but:

I liked that bag so much, I had to make another for my friend (you'll be happy to know that the sewing is improved on the second version):

And here's detail of those appliques:

Monday, June 14, 2010

making heads turn

How can anyone resist $.33 plastic headbands that are on sale at Craft Warehouse? Not I!
This was a lot of trial and error, but once I established a crafting template, I could easily replicate. So I thought, hmm....could I script my very own tutorial?
Here goes...
Step 1: headbands!

Step 2: sew a casing. That is, cut a long strip of fabric that's twice as wide as the widest part of the headband, plus a teensy bit more for the seam allowance. Make sure the fabric is just as long as the outer edge of the headband's curve, plus at least two inches longer on either side. Then, fold the strip hot-dog style and sew along one side.

Step 3: turn that casing inside out! Use a safety pin to catch one end of the casing.

Then, work the safety pin through the inside of the casing, by scrunching it along. A childhood friend taught me this trick when you want to re-string any kind of drawstring.
Once the casing is the right way, pull it over one end of the headband. (not shown in photos)

Step 4: This is where I fudge. To secure the ends of the fabric, I pleat over the ends and sew them under. This can be tricky, because you want the ends of the fabric to stretch as taut as possible if you don't want headband fabric to be all saggy.


It won't look perfect, but the ends are tucked behind your ears, anyway - who sees that part?
Step 5: Adorn away! I used hair accessories that may or may not look familiar. It's wise to try on the headband in the mirror to determine the placement of said adornment.

Tuesday, June 8, 2010

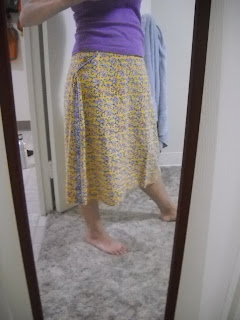
skirt with pockets

This began as a thrift store dress I found at a Value Village in Seattle in the "ethnic" section. Where I belong, I feel.
It came off the rack as a traditional, salwar kameeze type of Indian dress with short sleeves and the high neck. Probably a few sizes too big.
On a whim tonight, I turned the dress into a skirt, and decided to add pockets.
Pros: this turned out to be a quick little bonus sewing project. This dress had the honors of hanging in my closet (which meant I was flirting with the idea of wearing it) and wasn't even in my stash!
Cons: Regretfully, I still have lots of obligatory sewing projects to do.

12 hours

Waking up at 5 a.m. gives you a lovely perspective sometimes. Not only do you feel like you're an 80-year-old fisherman, you also feel like the morning light is a glorious catch that needs to be documented. So I started with one photo of these homegrown peonies, and kept going with my day. A good day it was.